د.إ0.00
Showing all 13 results
-
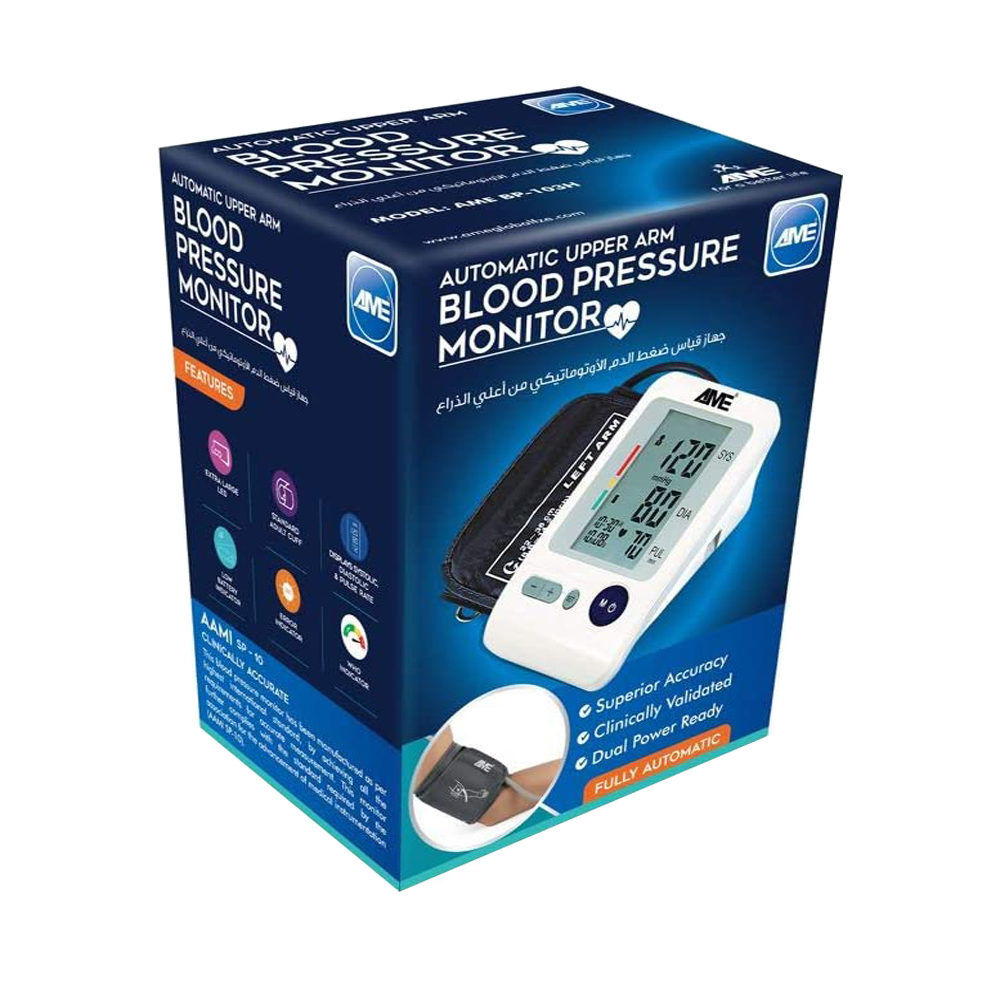
AME AUTOMATIC BLOOD PRESSURE MONITOR
د.إ175.00DESCRIPTION
AME Upper Arm Blood Pressure Monitor is a highly durable machine for Home Use.
- It can be used by 4 people in the house with separate memory zones for each person.
- Date/Time stamps to check back when the measurement was taken.
- WHO Hypertension Classification Indicator (The Traffic Signal) allows everyone to understand what their Blood Pressure is – even if they are not a medical student.
- If the arrow on the screen comes to GREEN, Blood Pressure is Normal.
- If the arrow on the screen comes to Yellow, Blood Pressure is borderline or “Pre-Hypertension”
- If the arrow on the screen comes to RED, Blood Pressure is Very HIGH or “Stage 1 or Stage 2”
BENEFITS
- Extra Large LCD is perfect for elderly patients and makes it a perfect gift to send home.
- Arrhythmia Indicator (Irregular Heartbeat Indicator), this allows the user to determine if the heart is performing Normally.
- Incase of any irregularities, the AME Blood Pressure Monitor can let the user know if the heartbeat is irregular based on “Pulse Pattern”
- The Machine is also ready to be used with an adapter and also works with batteries.
HOW TO USE
Please see the product leaflet
-
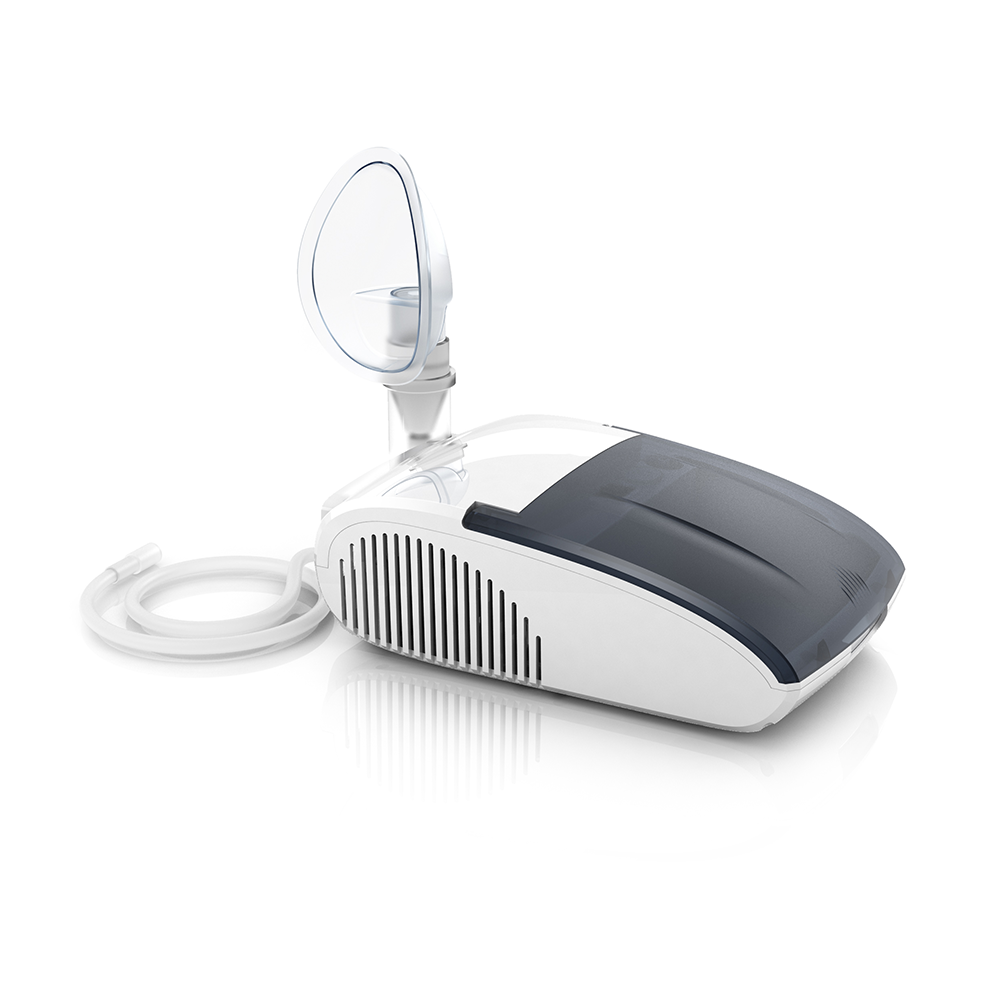
AME COMPRESSOR NEBULIZER
د.إ210.00DESCRIPTION
AME Compressor Nebulizer MAXNEB I is a highly durable machine for Home and Clinical Use.
Continuous Operation & Heavy Duty Motor:
The AME Compressor Nebulizer MAXNEB I can operate continuously without stopping for more than 100 Hours! This is important if you have more family members who need to use the nebulizer. You do NOT have to let the machine rest between medication times due to its Heavy Duty Motor.
Low Sound Level:
All Compressor Nebulizers will make noise due to the fact that they run on a Piston Compressor Technology. However, the AME Compressor Nebulizer emit a low sound which does not disturb the sleeping child. Less than 60db of sound 2m away from the Nebulizer.
Accessories Included:
The AME Compressor Nebulizer Includes
- 1 Adult Mask
- 1 Child Mask
- 2m Connecting Tube between machine and chamber
- 1 Angled Chamber to avoid medicine wastage
- 5 pcs Air Filters (1 filter lasts for 2 months approximately)
- 1 Instructions Manual (English & Arabic)
Please do not cover the air inlets with blankets or other materials. The nebulizer is NOT a Steam Inhaler.
BENEFITS
Low Noise
2M long tube (so Nebulizer machine can be kept away from children during procedure)
Adjustable pressure of the nebulization
HOW TO USE
See the product leaflet
-
ANEROID SPHYGMOMANOMETER BP APPARATUS
د.إ150.00A sphygmomanometer, also known as a blood pressure monitor, or blood pressure gauge, is a device used to measure blood pressure, composed of an inflatable cuff to collapse and then release the artery under the cuff in a controlled manner, and a mercury or aneroid manometer to measure the pressure
Contains
Sphygmomanometer
Stethoscope -
Compressor Nebulizer Model NE-821
د.إ275.00Description
● 1.5- 6 Liters Flow Optional, Accurate 0.1L/min
● Concentration 93%±3% Anion Function, Anion is the Vitamin of the Air
● With Nebulization
● Rating Power 250VA Rating Current 1.15A
● Remote control 150m without block by wall
● Noise less than 42dB
Pcs/carton: 1pcs/carton
N.W(kg): 5.8kg
G.W(kg): 7kg
Carton size: 46*26.5*46.5cm
Volume: 0.05cbm
20GP: 520pcs
40GP: 1080pcs
40HC: 1360pcs
Alarm System
Low oxygen concentrator alarm
Power outage alarm
Pressure cycle failure alarm
Compressor failure alarm -
Contour Blood Glucose Monitor
د.إ60.00Ascensia Contour Blood Glucose Monitoring System is intended for self-testing by people with diabetes to monitor glucose concentrations in whole blood. It is designed with No Coding technology, so the meter codes itself everytime you insert a test strip.
-
Contour Test Strips 50pcs
د.إ100.00The pack contains 50 Blood sugar testing strips for Contour Glucometer. Suitable only for Contour Blood Glucose monitoring kit.
-
Hearing Aid WIth UV BOX
د.إ160.00JECPP Hearing Aid for The Elderly Sound Amplifier Hearing Enhancement Device Hearing Assist with Sterilizing Box
-
ONE TOUCH VERIO REFLECT GLUCOMETER
د.إ170.00Before using the OneTouch Verio Reflect™ meterto test your blood glucose, carefully read the Owner’s Booklet and inserts that come with the components of the system.
How do I turn on the OneTouch Verio Reflect™ meter?
Press and hold ‘OK’ until the Welcome screen appears. Once the device is on, release ‘OK’. You can also turn the meter on by inserting a test strip into the test strip port. If you see any missing pixels within the Welcome screen, there may be a problem with the meter. Contact Customer Care.How many results will the OneTouch Verio Reflect™ meter store?
Your meter stores your most recent 750 blood glucose and Control Solution results. Control Solution results are stored in the meter and can be seen when reviewing past results on the meter.Where can I find my result after it is displayed on-screen?
Using the Results Log, you can review the most recent 750 results. Up to four results are displayed on the screen, starting with the most recent. The Results Log will display results in the order in which they were taken.From the Main Menu, press ∧ or ∨ to highlight Results Log and press ‘OK’.
What Messages does the Blood Sugar Mentor™ provide?
The Blood Sugar Mentor™ provides insight on how you’re doing and diabetes management guidance, including educational and motivational messages based on your current and previous glucose results and other tracked data. When you receive your blood glucose result, the meter may display Mentor Tips (guidance), Pattern Messages (insight) or Awards (encouragement).Mentor tips appear on the meter when your results are consistently in range or trending low or high.
Pattern Messages appear when the meter identifies a pattern of glucose results that fall outside the high and low range limits set in the meter.*
Awards are earned when certain Award criteria are met, such as meeting the Daily Test Goal or tagging results.
With the Blood Sugar Mentor™, patients get personalised guidance, insight, and encouragement so they can take actions based on their current result.* Always use the current result for immediate treatment decisions.
Do Not use Pattern Messages to make immediate or significant changes to the diabetes care plan without first consulting your healthcare professional. Always consult your healthcare professional before making significant changes to your diabetes care plan.
Do Not wait for Pattern Messages to treat low or high results.
What is ColourSure® Dynamic Range Indicator?
The OneTouch Verio Reflect™ meter comes with a ColourSure® Dynamic Range Indicator feature that instantly shows whether the result is below (blue), within (green) or above (red) range limits. It also shows when patients results are near the low or high end of the target range. It does this by displaying the result with a Range Indicator icon pointing to a segment on the Colour Bar based on the ranges set in the meter. The Range Indicator icon may be either an emoji or text. Use the Range Indicator icon and the segmented Colour Bar together to see where your result falls within your range limits.The meter comes with pre-set range limits that can be changed as recommended by your healthcare team. The pre-set low range limit is 70 mg/dL and the pre-set high range limit is 180 mg/dL.*
* Be sure to talk to your healthcare professional about setting the range limits that are right for you.
How can I change the low and high range limits from the pre-set limit?
From the Settings Menu, press ∧ or ∨ to highlight Range/90d and press ‘OK’. Your current meter settings are displayed. You then highlight the range setting to be adjusted and press ‘OK’. Adjust the low limit and press ‘OK’. Repeat this step to change the High Limit.Press (Backwards arrow icon) to return to the Main Menu.
Do I get notification when I need to test?
Yes. The Test Tracker feature in the meter lets you set the number of glucose tests you plan to take each day and automatically tracks progress towards achieving that goal. The meter is pre-set with a Daily Test Goal of four tests per day. The maximum Daily Test Goal is eight.*To turn off the Test Tracker, press ∨ until Off is highlighted, and press ‘OK’.
* Be sure to talk to your healthcare professional about the Daily Test Goal that is right for you.
What is Trend 90 and how do I set my 90 Day Average Target?
Trend 90 lets you set your blood glucose 90 Day Average Target and tracks progress towards that goal. The graph of averages is automatically updated every two weeks and provides a view of how your overall glucose control is trending over time. The meter is pre-set with a 90 Day Average target 155 mg/dL. Limits can be changed within a range of 90 – 265 mg/dL.*To adjust the 90 Day Average Target, please refer to “How can I change the low and high range limits from the pre-set limit?”
* Be sure to talk to your healthcare professional about setting the range limits that are right for you.
Why do I need to set a Daily Test Goal?
Because if the Test Tracker is on, the meter lets you set the number of glucose tests you plan to take each day and automatically tracks progress towards achieving that goal.* The meter is pre-set with a Daily Test Goal of four tests per day. The maximum Daily Test Goal is eight.When using the OneTouch Reveal® app**, you can set up each Goal and track Goals on a daily or weekly basis by tapping the radio button that appears at the bottom of Goal Tracker (Goals: Blood Glucose Test Goal, Steps Goal, Carbs Goal and Activity Goal).
*
Be sure to talk to your healthcare professional about the Daily Test Goal that is right for you.**
OneTouch Reveal® mobile app is intended for use by people with diabetes to view, track, trend and share data from blood glucose meters to support diabetes management of blood sugar levels. The app is available for use on compatible Apple iOS AndroidTM devices, and is designed to work with wireless OneTouch® blood glucose meters. The OneTouch Reveal® mobile app Help File contains in-depth information.
What batteries does the OneTouch Verio Reflect™ meter use?
Your OneTouch Verio Reflect™ Meter uses 2x CR2032 lithium batteries.How can I use Bluetooth® on my meter?
In order to connect your meter with your compatible mobile device, the BLUETOOTH® feature will need to be turned on. On the Settings Menu, highlight Bluetooth and press ‘OK’.When
you will be prompted to connect with the OneTouch Reveal® mobile app. Press ‘OK’. When you have downloaded and installed the OneTouch Reveal® mobile app on your compatible wireless device, scroll to the right to tap the image of the meter. You will be prompted to look for the Bluetooth® icon in the top-right corner of your meter’s screen; if you see it, tap Bluetooth®.
If you do not see the Bluetooth® icon, then Bluetooth® is turned off on your meter. Tap No Bluetooth® and the app will walk you through how to turn on Bluetooth® from the meter. When prompted by the app, enter the PIN number displayed on your meter screen using the app keypad and tap Pair.
After you open the OneTouch Reveal® mobile app on your mobile device, follow the on-screen instructions. Look for “OneTouch” and the last 4 characters of the meter serial number on the compatible mobile device display to correctly identify your meter. The meter screen will display the pairing info to look for on your compatible wireless device.
The OneTouch Verio Reflect™ Owner’s Booklet contains detailed instructions for connecting your meter to a compatible wireless device.
Can I transfer my readings to a computer? What software may be used with my OneTouch Verio Reflect™ meter?
Your meter can work with diabetes management software, which provides a visual way to track key factors that affect your blood sugar. To learn more about diabetes management tools available to you, contact Customer Care.Hardware and software requirements needed to use the OneTouch Reveal® web app can be found at https://www.onetouchmea.com/OneTouchReveal.
What should I do when Error screens appear?
The OneTouch Verio Reflect™ meter displays messages when there are problems with the meter and with the test strip. Review the troubleshooting section of the Owner’s Booklet and if you cannot resolve the error with your meter, contact Customer Care.Need more answers not related to this specific product? Learn more on the FAQ section of the website! Learn more
iOS is a trademark of Apple Inc., registered in the US and other countries. App StoreSM is a service mark of Apple Inc. Android™ and Google Play are trademarks of Google Inc.Apple, the Apple logo, iPhone, iPad and iPod touch are trademarks of Apple Inc., registered in the U.S. and other countries.
The Bluetooth® word mark and logos are registered trademarks owned by Bluetooth SIG, Inc., and any use of such marks by LifeScan Scotland Ltd. Is under license. Other trademarks and trade names are those of their respective owners.
-
ONETOUCH DELICA LANCETS 100PCS
د.إ60.008 out of 10 people with diabetes agreed that testing with the OneTouch Delica Plus lancing device was less painful compared to other lancers they have used.
-
ONETOUCH SELECT PLUS FLEX GLUCOMETER
د.إ150.00Before using the OneTouch Select Plus® meter to test your blood glucose, carefully read the Owner’s Booklet and inserts that come with the components of the system.
How do I turn on the OneTouch Select Plus® meter after the first time set up?
Press and hold ‘OK’ until the start-up test screen appears. Once the start-up screen is displayed, release ‘OK’. You can also turn the meter on by inserting a OneTouch Select Plus® test strip to perform a blood glucose test.How many results will the OneTouch Select Plus® meter store and where can I find my result after it is displayed on-screen?
The meter stores your most recent 500 blood glucose and control solution test results and displays them in several ways.From the Main Menu, press ∧ or ∨ to highlight the Results Log and press ‘OK’. You can then scroll through the results by pressing ∧ or ∨.
What batteries do the OneTouch Select Plus® meter use?
Your OneTouch Select Plus® meter uses 2x CR2032 lithium batteries. Please do not use rechargeable batteries.ColorSure™ technology
What are the low and high range limits and what do they mean?
Your meter uses low and high range limits to tell you when your result is below, above or within the limits that you set in the meter.* The meter comes with pre-set range limits that can be changed as recommended by your healthcare team. If the meal tagging feature is turned on, you can also edit your pre-set before and after meal ranges.
*The low and high range limits you set apply to all glucose test results. This includes tests taken before or after mealtimes, medications and around any other activities that may affect your blood glucose.How can I change the low and high range limits?
The General range limits you set during the first-time set-up apply to all untagged glucose results, unless Meal Tagging is turned On.The meter also provides Meal Tagging to help identify
Before or After Meal tests. With Meal Tagging On, you can set up additional “Mealtime” low and high range limits.
To change General range limits, highlight Range on the Settings screen and press ‘OK’. Press the ∧ and ∨ symbols to change the low and high limits and press ‘OK’.
A Saved screen will appear to confirm that the low and high limits displayed are now stored in the meter.
To change Mealtime range limits, check the Settings screen to be sure that Meal Tagging is turned On. Then highlight Range on the
Settings screen and press ‘OK’.Highlight Before Meal or After Meal and press the ∧ and ∨ symbols to change the Before Meal and After Meal range Limits. When complete, the Save screen appears to confirm that the Before and After Meal range limits displayed are now stored in the meter.
Be sure to talk to your healthcare professional about the low and high limits that are right for you.
-
ONETOUCH SELECT PLUS STRIPS 50 PCS
د.إ150.00Before using the OneTouch Select Plus® test strips to test your blood glucose, carefully read the Owner’s Booklet for your meter and the inserts that come with the components of the system.
How do I insert the OneTouch Select Plus® test strip into the meter?
Insert the OneTouch Select Plus® test strip into the test strip port with the contact bars facing you.
How much blood do I need for the OneTouch Select Plus® test strip?
The OneTouch Select Plus® test strips require a minimum of 1.0 μL of blood.
How do I apply blood to the OneTouch Select Plus® test strip?
Keeping your finger extended and steady, move the meter and test strip towards the blood drop.
Gently touch the channel to the edge of the blood drop.
Wait for the confirmation window to fill completely. The blood drop will be drawn into the narrow channel and the confirmation window should fill completely.
How should I store my OneTouch Select Plus® test strips?
Keep test strips in a cool, dry place between 5°C and 30°C.
Do Not test if there is condensation (water build-up) on your meter. Move your meter and test strips to a cool, dry place and wait for the meter surface to dry before testing.
Do Not open the test strip vial until you are ready to remove a test strip and perform a test. Use the test strip immediately after removing it from the vial, especially in high humidity environments.
Close the cap tightly on the vial immediately after use to avoid contamination and damage.
Only store unused test strips in their original vial.
Do Not return the used test strip to the vial after performing a test.
Do Not re-use a test strip that has had blood or control solution applied to it. Test strips are for single use only.
Do Not test with a test strip that is bent or damaged.
You may touch the test strip anywhere on its surface if your hands are clean and dry. Do Not bend, cut or modify the test strip in any way.
When you first open a vial of test strips, record the discard date on the label. Refer to the test strip insert or vial label for instructions on determining the discard date. -
ONETOUCH VERIO STRIPS 50 PCS
د.إ100.00Before using the OneTouch Verio® test strips, carefully read the Owner’s Booklet for your meter and the inserts that come with the test strips.
How do I insert the OneTouch Verio® test strip into the meter?
Insert the OneTouch Verio® test strip into the test strip port with the gold side of the test strip and the two silver prongs facing you.
How much blood do I need for the OneTouch Verio® test strip?
The OneTouch Verio® test strips require only 0.4μL of blood.
How do I apply blood on the OneTouch Verio® test strip?
When the Apply Blood screen appears on the display, you can apply your blood sample to either side of the test strip (to the opening of the channel).
Apply your sample to the opening of the channel.
Be sure to apply your sample immediately after you get a drop of blood.
Holding the meter at a slight angle, guide the channel to the blood drop.
When it touches your sample, the test strip wicks blood into the channel. The channel should fill completely.
The channel turns red and the meter will count down from 5 to 1.
Blood should not be applied to the top of the test strip or to the top edge of the test strip.
determining the discard date.How should I store my OneTouch Verio® test strips?
Keep test strips in a cool, dry place between 5°C and
30°C. The meter and test strips should be about the same temperature before you test. Do not test if there is condensation (water build-up) on the meter. Move your meter and test strips to a cool, dry place and wait for the meter surface to dry before testing.
Do not open the test strip vial until you are ready to remove a test strip and perform a test. Use the test strip immediately after removing it from the vial.
Tightly close the cap on the vial immediately after use to avoid contamination and damage.
Only store unused test strips in their original vial.
Do not return the used test strip to the vial after performing a test.
Do not re-use a test strip that has had blood, control solution, or any contaminants applied to it. Test strips are for single use only.
You may touch the test strip anywhere on its surface if your hands are clean and dry. Do Not bend, cut or modify the test strip in any way.
When you first open a vial of test strips, record the discard date on the label. Refer to the test strip insert or vial label for instructions on determining the discard date. -
Portable Nebulizer Xnuo Model W-100
د.إ546.00Indicator: LCD indicator
Method: Ultrasonic
Nebulizing Rate: 0.5 mL/min
MMAD: 1-5um more than 60%
Noise: <45dB Power: 1200 mA lituium battery USB connector Weight: 80g Operation Temperature: 5 – 40 °C Operation Humidity: 30 – 80 %RH Operation Atmospheric Pressure: 700 – 1060 hpa Storage Temperature: -20 – 55 °C Storage Humidity: 40 – 93 %RH Storage Atmospheric Pressure: 500 – 1060 hpa